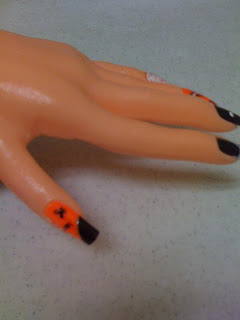
For this mani, I painted each of the nails the base color, OPI Black Onyx, OPI Alpine Snow, and the orange was a Color Club polish, on the thumb I did a diagonal french using the black onyx then did a silver glitter line above it using my Stripe Rite Stripers. For the spiders i used my dotting tool and then the stripers to make the legs. For my web I used a white striping brush and then put silver glittter over top. On the middle finger I made two dots with my large dotting tool and OPIs alpine snow polish and then added two small black dots with my smallest dotting tool and OPIs black Onyx. On the ring finger i used my black white and silver glitter striping polishes to make random slash looking lines on the nail, and then used my small dotting tool to add black dots. The pinky was probably the most fun since I got to feel like a four year old again. I started by using my striper to do the large spot of blood at the free edge of the nail. For the splatters I made sure to have a little polish on my red striper and then I tapped the end of the brush to splatter the paint on the nail. This was messy and had my boss staring at me like I was crazy but the end result was worth it. :) (Be sure to cover the other nails when doing the blood splatter nail, or you'll have red polish on all of them).
Thursday, October 27, 2011
Monday, October 24, 2011
Birds Of a Feather Flock Together..
I did this Mani on my new fake hand! My Boyfriend keeps asking why im painting the hand of his blow up doll. Its impossible to wear polish and change it this often with work (taking off everyone else's polish takes mine off to) So I usually stick to a gel french( Boring, I know). I might give the hand a name eventually, but for now I'll just call it Hand. Maybe I'll let the bf name her, since he knows her so well.
Anyways the polishes used are Orly Brand:
The purple shimmer which is gorgeous is called "Fowl Play"
And the turquiose is called "Lucky Duck"
Doing a different color on the ring finger is an attention grabber, and can really give attention to a awesome polish. Without over doing it with to much nail art.
I really like the colors. However, I can say I was a little dissapointed that they each took about 4 coats to reach Opacity. When most OPI polishes I use here at work ""usually"" only take 2 coats.
The purple is actually really awesome up close, but I'm at work and my camera on my phone couldn't get the shimmer and glitter pieces in this picture.
So after looking at this I decided to give you another option to make the ring finger pop on this mani. I added a few turquoise gems to it , you can also see the dimension to the purple polish a little better here:
Tools Of The Trade.
This is my collection of nail stuff that helps to make nail art and polishing much easier and more professional looking. First of all good cuticle nippers are a major bonus, clipped cuticles show off your manicure and make polishing and cleanup much easier. A good pusher, nail clippers file and a buffer help to finish off nail preparation and get you on your way to polish!
I use a Kolinsky Brush :: pictured below:: (used for acrylic) as a brush to clean polish from the skin, cuticles etc. Dip the brush in a dappen dish full of acetone ( a shot glass, or any glass cup or bowl around the house works also) Tap brush on a paper towel to prevent drips, and presto you have the most precise mistake fixer you can get! *Qtips and cotton seem to always make their way into the polish when used to clean up. This is also the same brush I use to perfect my Smile line when doing my french manicures. This is probably one of the most helpful tricks Ive learned, especially in perfecting your french mani.
This scary looking thing below makes rough heels a synch. So I figured I'd share what we call the "cheese grater" with you. Yes, gross I know, but the smooth results are way more attractive. You can find them on Ebay, or at professional beauty stores like CosmoProf. Its made by Microplane and is by far the best I've used so far. Combine this with a Pumice stone and you'll have feet as smooth as a babys butt.
This is the bowl that i use for the water marbling that I showed you in my last post. The size seems to be just right and the plastic gives the polish something to grab on to.
This is my collection of striping polishes. You can get these at Sally's Beauty Supply, or CosmoProf the brand is Stripe RITE. These and Precision brand seem to have longer thinner brushes that work much better.
These are a cheaper line of stripers called Kiss, The brushes are not as good and the color goes on very light. I mainly use these ones for adding glitter to designs.
Cuticle oil. Enough said. Any brand will do I like that his one can be applied with a brush instead of dropped on. This also works as a instant polish dryer. However, my idea of instant and how fast it actually dries is a little different. But it does help speed up the process a bit. Always wash hands if using cuticle oil before polishing. Or wipe with alcohol, the more oil on the surface of the nail the more chance you have of lifts and chips.
These are the American Manicure line, its applied exactly like a french manicure. Only its has a very natural look to it. The smile line is more of an ivory. And then the base is a clear pink.
China Glaze Innocence (below) one of my favorite bases for french mani's. Its more of a milky pink. People who don't like a lot of color or can't have bright polishes at work usually love this. It also looks great over the entire nail without french.
OPI's natural nail strengthener, works very well to help add strength to brittle or weak nails. * Most strengthening polishes usually contain small fibers that layer over each other to add strength to the nail, so be sure to shake before use, and do two thin coats and let dry well before adding your color on top.
Below are my dotters, Which work well for almost anything nail art and have been a ton of help since I've got them. They give dots more of a perfect and professional looking shape. Filed down toothpicks always work well for those who cant find these. I got mine at a beauty supply store. Ive seen them on Ebay, and you can even check your local craft store (Thanks, Aleta).
These are the fimo clay pieces and jewels that I buy from CosmoProf.
This dotting tool is my favorite so far because it's super tiny and has a detailing brush on the other end. Oh, the best part is it was on sale at Sally's for $2.99.
Having good tools always makes getting the look you want easier. But most tools can be substituted with things you find laying around the house.
Sunday, October 23, 2011
Water Marbleing Made Easy..
I'm going to post a link showing how to do this one because seeing a video is much easier than me describing how to do this one. But I will give you a few helpful tips that made this much easier for me. --> Click Here To Watch The Video The designs above are mine but the video is not.
*This design takes a little bit of time, because you have to make a new design for every finger. So it can be time consuming and a bit irritating in the beginning to get the designs just right.
- Use bottled water at room temperature it works much better than tap water.
- Pour the water into a small plastic bowl (that you wont mind ruining with polish).
- If you have trouble with getting the polish to spread out and stick to your bowl, empty it out, dry it, and use nail polish to paint a ring around the inside of the bowl (to the same level the water will be at) let dry and refill the bowl (this gives the polish something to grab to).
- Experiment with polishes to see which work best for you. Some dry on top of the water to quick, some wont spread out well, and some don't stay true to the color they were. I've found OPI, and China Glaze work well. However large glitter polishes don't work so great. I also tried a few 99 cent polishes from Walmart, they didn't work at all.
- Use a tooth pick to gently make your designs after you make your bulls eye like showed in the video.
- Clean the toothpick regularly while making the design. If the polish lumps on the toothpick it will rip a hole in your design and you'll have to start over.
- Use a base coat on your nail like OPI Alpine Snow.
- Taping around the nail with scotch tape help make clean up ALOT faster. Or you can use a Kolinsky nail brush ( Qtips work well to, orangewood stick wrapped in cotton, or paint brush from a craft store) dipped in acetone to clean up after you dip your finger.
- When you dip your finger make sure you have it on the part of the design you want to see on your nail, and then clean the rest of the design by swirling a toothpick around to remove the rest of the polish from the top of the water and around your finger.
Wonderfully Watermelon..
Start by using a small dotting tool ( If you cant find a dotting tool a toothpick filed down on one end works to) and red polish to make diagonal polka dots halfway up the nail, clean your dotter or get a new tooth pick and make white polka dots in every other red dot in the first two or three lines. Next use a silver glitter striper (Sallys Beauty Supply) to make a diagonal line all the way across the nail above your dots. Use nail glue or a top coat to stick a few gems on your glitter stripe. A tooth pick with a little top coat on the end helps to pick up the gems, and place them on the nail. Next use nail glue to glue on two fimo watermelon (Also from Sally's or Cosmo Prof) to the right side of the nail, you can place the watermelon on top of eachother or however you like. [Be creative!] Use a red striper to make a diagonal line halfway across the nail starting next to the watermelon, above the red line do the same thing using a solid silver striper. Finish with topcoat like Seche Vite, OPI, Tough Coat or whatever you prefer. Hope you liked this or it inspires your creativity!
- If you Cant afford to buy every color striping polish out there you can buy a striping brush from a craft store or beauty store for around $3. And then use any nail polish you have laying around.
Lemon Drop Love..
I started this design with a yellow diagonal french, If you cant get the line perfect you can use tape, or a Kolinsky brush and acetone (Sally's Beauty Supply), then glue on two thin fimo lemon pieces (I found them at Sally's Beauty Supply also) Nail glue works well to bond them to each other and the nail. Just be careful because the nail glue will mess up the nail polish if it runs. Make two circles around the lemons using a silver glitter striper (I like Percision Stripers, And Stripe Rite). Next make a half circle on each side of the nail using the glitter striper. Use a small dotting tool to add small silver glitter dots around the lemons (Giving it a sugared effect). And then add white dots around the half circles using the same size dotter. Finish by gluing two yellow gems inside each nail and adding a good topcoat like Seche Vite, or Tough Coat that works good with nail art.
Subscribe to:
Posts (Atom)